
neuromore Studio
Experiences for Neurofeedback
How to Give Users Feedback?
Section titled “How to Give Users Feedback?”neuromore Studio offers four ways to give users neurofeedback and biofeedback:
- Built-in games. Studio starts a game and your classifier controls it, for example the speed of a car or the weather.
- The Experience window. A state machine plays video and audio inside Studio, and your classifier controls the brightness and volume.
- Browser video. Studio sends feedback values over WebSocket to the Chrome extension, which controls video brightness and volume in the browser. See Browser neurofeedback and the Chrome extension guide.
- Your own software over OSC. Any program that reads OSC can use the values, for example a Unity game, a music application or a script on a Raspberry Pi. We provide a Unity prefab. See OSC for the interface.
Using Pre-Built Games and Visualizations
Section titled “Using Pre-Built Games and Visualizations”The fastest way to create a neurofeedback experience is to use one of the games that come with Studio.
What Visualizations Exist?
Section titled “What Visualizations Exist?”Studio includes four visualizations. Which ones you can start depends on your platform:
| Visualization | Windows (x64, x86) | macOS | Linux (x64) |
|---|---|---|---|
| Forest Walk | Yes | Yes | Yes |
| Infinite Tunnel | Yes | Yes | Yes |
| Cartoon Town | Yes | No | No |
| Tropical Island | Yes | No | No |
If a visualization has no program for your platform, it stays visible but disabled. Its tile shows COMING SOON, with the tooltip “Not yet available for your platform.” No visualization has a program for Windows ARM64 or for Linux on other CPUs.
Cartoon Town
Section titled “Cartoon Town”Drive a little car through a cartoon style town. The feedback controls the speed of the car while it moves through the city on its own.
The town has two stages, City and Farm. A session starts in City. To reach the Farm stage, follow the same steps as for the Infinite Tunnel and double-click the Farm row in the stage table. Send a value to /crops there to control the size of the crops.
Infinite Tunnel
Section titled “Infinite Tunnel”Fly through an endless tunnel. Feedback can change the tunnel color and size and the camera speed.
The tunnel has two stages, Tunnel and Spaceship. To show the spaceship with its smoke:
- Start the visualization. Studio then shows a stage table in the Session Control window.
- Begin the session and leave Manual Stage Control on. It is on by default.
- Double-click the Spaceship row in the stage table.
- Send a value to
/exhaust-smoketo control the amount of smoke. See the list of addresses.
Forest Walk
Section titled “Forest Walk”Walk slowly through a forest. Feedback can change the walking speed, sunlight, fog, clouds and rain.
Tropical Island
Section titled “Tropical Island”Control the sky and sea, from a sunny beach to a tropical storm. Feedback can change the sun, rain, wind, waves and camera speed.
How to Start a Visualization?
Section titled “How to Start a Visualization?”-
Start the visualization in one of two ways:
- In the Visualizations menu, click its name. It starts straight away.
- In the Session Control window, click the eye button next to “Visualization:”. In the Select Visualization window, move the pointer over a tile and click START, or double-click the tile.
-
Cartoon Town and Tropical Island can first show a dialog for screen resolution and graphics quality. Choose your settings and start the game from the dialog. Infinite Tunnel and Forest Walk have no such dialog.
-
The game shows an empty screen with the neuromore logo. This is expected. A visualization stays blank until a session is running.

-
In Studio, open a classifier or design that contains feedback nodes for this game. See How can I control the feedback below.
-
In the Session Control window, click the Begin Session button. The game now shows its scene.
Any classifier starts the session, but only feedback nodes that send values change the game. Without them, the game keeps its default values. For example, the car in Cartoon Town stands still, because its default speed is 0.
Keep these limits in mind:
- Keep the game open during the session. If you close it, Studio stops the session and shows “The session was stopped automatically because the visualization stopped.”
- Run one visualization at a time. On Windows and Linux, while one is running the eye button does nothing and shows no message, so close the running game first. On macOS, Studio does not track the running game, so it does not stop you starting a second one. Close the first game yourself.
How can I Control the Feedback in the Visualizations?
Section titled “How can I Control the Feedback in the Visualizations?”Connect your signal to a feedback node in the classifier. You can use a dedicated control node or a Custom Feedback node.
Values from 0 to 1
Section titled “Values from 0 to 1”The games expect values from 0 to 1. A raw value, such as a band amplitude, is usually outside this range. If a value leaves the range, the node shows the error “Value not in range”, but it still sends the value without clamping it. While the error shows, Studio can keep the Begin Session button disabled, so remap the value before you start.
To convert a value, put a Remap node from the Math category in front of the feedback node. Set Input Min and Input Max to your signal’s range, Output Min to 0 and Output Max to 1, and turn on Clamp Output.
Dedicated control nodes
Section titled “Dedicated control nodes”The Output category of the Classifier window has a node for the most common parameters. Drag it into the classifier and connect your signal. Speed, Sun, Clouds, Fog, Rain and Vignette Control send on a fixed address with Send OSC Msgs always on, so there is nothing else to set.
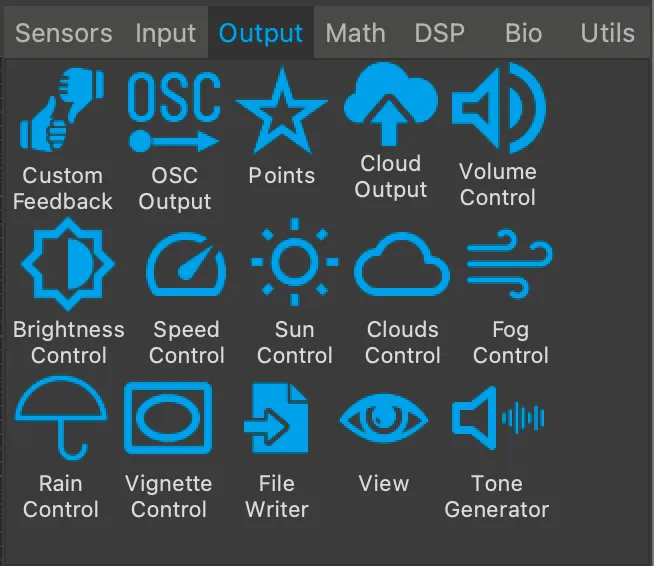
| Node | Address | Works in |
|---|---|---|
| Speed Control | /movement-speed |
Cartoon Town, Forest Walk, Infinite Tunnel |
| Sun Control | /weather-sun |
Cartoon Town, Forest Walk, Tropical Island |
| Clouds Control | /weather-clouds |
Forest Walk |
| Fog Control | /weather-fog |
Forest Walk |
| Rain Control | /weather-rain |
Cartoon Town, Forest Walk, Tropical Island |
| Vignette Control | /camera/vignetting |
All four |
| Volume Control | /audio/volume, in Visualization mode |
Cartoon Town, Infinite Tunnel, Tropical Island |
| Brightness Control | None | None. See below |
A node does nothing in a game that does not read its address. For example, Speed Control has no effect in Tropical Island, which uses /camera/movement instead.
Volume Control and Brightness Control
Section titled “Volume Control and Brightness Control”Volume Control works in Studio’s Experience window and over WebSocket to the Chrome extension. In Visualization mode, it sends /audio/volume to visualizations in the feedback bundle on port 45554.
Note: Not every build sends
/audio/volumeyet. 1.7.3 and the current 1.8.2 source don’t. In those builds, use a Custom Feedback node with the OSC address/audio/volumeand Send OSC Msgs on.
To use Visualization mode, set the node’s Mode attribute to Visualization. The default is Studio Volume.
Brightness Control works in Studio’s Experience window and over WebSocket to the Chrome extension. It sends no OSC, deliberately, and games have no brightness address.
Custom Feedback for any address
Section titled “Custom Feedback for any address”Use a Custom Feedback node for every address that has no dedicated node, such as wind, pollution, crops and most camera effects.
- Drag a Custom Feedback node from the Output category into your classifier and connect your signal.
- Select the node and turn on Send OSC Msgs. It is off by default.
- Set OSC Address to one of the addresses below.
- Leave Is Ranged on, with Range Min at 0 and Range Max at 1. These are the defaults.
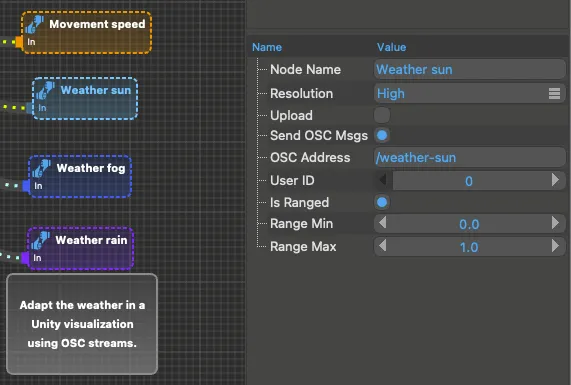
Send OSC Msgs puts a node’s value in the feedback bundle on port 45554, not on 4546. Each message has four arguments: value (float), is ranged (bool), range min (float), range max (float). OSC Output nodes use port 4546.
So an OSC Output node does not reach the games with default settings. Use the feedback nodes on this page instead.
What Feedback Parameters Can I Control?
Section titled “What Feedback Parameters Can I Control?”These are the addresses each game reads. All values go from 0 to 1.
Movement
Section titled “Movement”| Address | Controls | Games |
|---|---|---|
/movement-speed |
Car speed, in Cartoon Town’s City stage only, or camera speed | Cartoon Town, Forest Walk, Infinite Tunnel |
/camera/movement |
Camera speed, in the Beach stage only | Tropical Island |
Environment
Section titled “Environment”| Address | Controls | Games |
|---|---|---|
/weather-sun |
Sunlight | Cartoon Town, Forest Walk, Tropical Island |
/weather-rain |
Rain. In Forest Walk, it is on only at exactly 1 | Cartoon Town, Forest Walk, Tropical Island |
/weather-wind |
Wind | Tropical Island |
/weather-fog |
Fog | Forest Walk |
/weather-clouds |
Dense clouds, on only at exactly 1 | Forest Walk |
/ocean |
Waves and sea sound | Tropical Island |
/pollution |
Pollution particles, in the City stage only | Cartoon Town |
/crops |
Crop size, in the Farm stage only | Cartoon Town |
/tunnel-color/r, /tunnel-color/g, /tunnel-color/b, /tunnel-color/a |
Tunnel color | Infinite Tunnel |
/tunnel-size |
Tunnel size | Infinite Tunnel |
/exhaust-smoke |
Spaceship smoke, in the Spaceship stage only | Infinite Tunnel |
| Address | Controls | Games |
|---|---|---|
/audio/volume |
Overall game volume | Cartoon Town, Infinite Tunnel, Tropical Island |
These three games start at volume 0, so they stay silent until they receive this address. Forest Walk does not read it.
Camera
Section titled “Camera”All four games read these addresses.
| Address | Controls |
|---|---|
/camera/blur |
Motion blur |
/camera/vignetting |
Vignette |
/camera/sepia |
Sepia, on from 0.5 |
/camera/grayscale |
Grayscale, on from 0.5 |
/camera/water/amount |
Amount of the water effect on the lens |
/camera/water/freeze |
See-through level of the water effect |
/camera/fade-color/r, /camera/fade-color/g, /camera/fade-color/b, /camera/fade-color/a |
Color and strength of a fade over the image |
Adding a Visualization to the List
Section titled “Adding a Visualization to the List”Studio looks for visualizations in a folder named visualizations, next to the application or up to four parent folders above it. On Linux it also looks in /usr/share/NMStudio/visualizations. It reads this list once at startup, so restart Studio after you add one.
Each visualization has its own subfolder with an Info.json file:
{ "name": "My Game", "executable": "MyGame", "description": "Shown on the tile in the Select Visualization window.", "image": "Thumbnail.png"}Give executable without a file extension. Studio adds .exe on Windows and .app on macOS. It looks for the program in these places, in this order:
- A subfolder for the platform and CPU, for example
win-x64orlinux-x64 - A subfolder for the platform, for example
osx-all - The visualization’s own folder
How Can I Create Experiences with Video and Audio Feedback?
Section titled “How Can I Create Experiences with Video and Audio Feedback?”Let’s say you want to build an experience where the user controls the brightness of a video with neurofeedback. You also want to ask them how long they want to train before it starts.
For that, you configure the application flow in a state machine, which runs the experience in the Experience window. First, the window asks the user to choose a training duration with a row of buttons. Then it plays the video, and a Brightness Control node in the classifier sets the video’s brightness.
For the full example, see Getting Started.
Pausing an Experience
Section titled “Pausing an Experience”When you pause a session, the Experience window holds the audio and video that are playing, dims the picture and shows PAUSED. Continue resumes them at the same position. See Running a session.
In 1.7.3: The Pause button exists, but audio and video keep playing and there is no PAUSED overlay.
External visualizations get no overlay. Studio keeps reporting the session as running during a pause, so a game keeps showing its scene.
How Can I Build My Own Games?
Section titled “How Can I Build My Own Games?”Building Your Own Games in Unity
Section titled “Building Your Own Games in Unity”To build games and multisensory neurofeedback experiences, use the neuromore Unity prefab from the public studio-visualizations-free repository. The repository contains:
Neuromore-package/Neuromore_package.unitypackage: the package to import into your project, with a demo sceneNeuromore-prefab-project: a small project with the prefab already set upForestScene: the Forest Walk project, as an example
These projects use Unity 2020.3.27f1.
How Do I Use the Unity Prefab?
Section titled “How Do I Use the Unity Prefab?”To add neurofeedback to your own game:
- Open your project in Unity 2020.3.27f1.
- Import
Neuromore_package.unitypackagewith Assets > Import Package > Custom Package. - Add the
neuromoreprefab fromAssets/Resources/neuromore prefab/Prefabsto your scene.
This video shows the general process of adding neurofeedback to a Unity game. It may not match Studio 1.8.2.
Try It with the Forest Scene
Section titled “Try It with the Forest Scene”The Forest Scene shows how to use the prefab. You control the weather and camera speed from Studio.
- Download the repository and open the
ForestScenefolder in Unity. - Open the scene
Assets/MainScene.unityand press Play in Unity. - In Studio, build a classifier that produces a value from 0 to 1. Getting Started shows how to do this with a Frequency Band node and a Remap node.
- Connect that value to a Speed Control node and a Sun Control node from the Output category.
- In the Session Control window, click the Begin Session button.
The camera speed and the light in the scene now follow the value.
How Does the Prefab Connect to Studio?
Section titled “How Does the Prefab Connect to Studio?”The prefab uses two connections:
| Port | Protocol | Direction | Used for |
|---|---|---|---|
| 45456 | TCP | Prefab to Studio | Studio Server connection. The prefab ignores all feedback until this connection is up. |
| 45554 | UDP | Studio to prefab | Feedback bundle, and the /studio/ip message that tells the prefab where Studio is |
If the game runs on the same computer as Studio, the default settings work.
If the game runs on another computer, turn on NMStudio > Settings > Network > Studio Server > Broadcast server announce. It is off by default, and without it /studio/ip only reaches the local computer. Also leave Enable TCP server on, and make sure your firewall allows both ports.
Stopping the game also ends the session, as with the built-in visualizations.
What Feedback Parameters Can I Use?
Section titled “What Feedback Parameters Can I Use?”The Forest Scene reads these addresses:
/movement-speed/weather-sun/weather-fog/weather-clouds/weather-rain- The
/camera/...addresses listed above /session/points, which Studio sends by itself when the session has points, and which updates a points label/session/level, which needs a Custom Feedback node and only updates a level label
To add an address of your own:
- Add a constant for it in
Assets/Resources/neuromore prefab/Scripts/Network/OSCMapping.cs. - Register it in
Assets/Resources/neuromore prefab/Scripts/DataHolder.cs. The prefab drops any address that is not registered there. If your project has an older prefab with anOSCDataHandler.csfile, add it to the list in that file too. - Use the value in
Assets/Resources/WorldController.cs.
In Studio, send it with a Custom Feedback node, as described above.