
Integrations
BrainBit connection and setup
R&D. Everything here is for research and development exploration. The OSC steps on this page are the same in Studio 1.7.3 and 1.8.2.
This page describes how a BrainBit device is meant to connect to neuromore Studio, how its data reaches the neuromore Engine, and the interim path intended for use until a native driver exists. It covers the device side only. The browser side is in Browser neurofeedback and the Chrome extension guide. The end-to-end check is in the BrainBit test workflow.
Support status
Section titled “Support status”BrainBit data reaches Studio today through the BrainFlow node, on Windows. The BrainFlow boards page lists this legacy board on NeuroSDK 1, which is not part of the two paths below.
Both paths below build on the vendor’s NeuroSDK 2. Neither is implemented. Channel counts, rates and platforms for the BrainBit 2, Flex 4 and Flex 8 are vendor data.
| Device | Channels | Path into Studio | Status | Platforms |
|---|---|---|---|---|
| BrainBit headband via OSC bridge | 4 EEG (T3, T4, O1, O2), 250 Hz, Bluetooth LE | External bridge process on NeuroSDK 2 sending OSC to OSC Input nodes | R&D, not implemented | Follows the vendor SDK, see Platforms |
| BrainBit 2, Flex 4, Flex 8 via OSC bridge | 4 or 8 EEG, 250 Hz, Bluetooth LE (vendor data) | External bridge process on NeuroSDK 2 sending OSC to OSC Input nodes | R&D, not implemented | Follows the vendor SDK, see Platforms |
| BrainBit family (headband, BrainBit 2, Flex 4, Flex 8) via native driver | 4 EEG for headband, BrainBit 2 and Flex 4; 8 EEG for Flex 8; 250 Hz, Bluetooth LE (vendor data) | New Studio device driver on NeuroSDK 2 | Planned | Target: Windows x64 and macOS arm64 first, Linux later |
Target: native BrainBit driver (Planned)
Section titled “Target: native BrainBit driver (Planned)”The target architecture has these steps:
- A BrainBit device, any model, connects over Bluetooth LE to a neuromore BrainBit driver inside Studio, built on the vendor’s NeuroSDK 2.
- The neuromore Engine runs the classifier.
- A Volume Control or Brightness Control node produces the feedback value.
- The WebSocket server at
ws://127.0.0.1:4547sends the value on. - The neuromore Chrome extension applies it as media element volume or CSS brightness.
Ports and formats are in the Interfaces table of Browser neurofeedback.
Status: Planned, not implemented. The driver would follow the existing Studio driver pattern: Engine device and node classes, a Studio-side driver with its own connection thread, and prebuilt vendor libraries copied next to the binary at build time. Target platforms are Windows x64 and macOS arm64 first, Linux later. The work needs hardware for testing and an answer on the vendor libraries. Vendor SDK licensing is not yet confirmed.
The plan is for a BrainBit device node to output one channel per electrode. The rest of the chain stays as described on the other pages: classifier, feedback node, WebSocket server or OSC Output nodes.
Interim path: OSC bridge
Section titled “Interim path: OSC bridge”Status: R&D, not implemented. Until a native driver exists, an external bridge process can forward BrainBit samples to Studio over OSC. The bridge is built on the vendor’s NeuroSDK 2, for example with the Python package pyneurosdk2. It connects to the device over Bluetooth LE and sends OSC over UDP to Studio’s OSC input, by default 127.0.0.1:4545. You can change the port in NMStudio > Settings > Network > OSC Server > Input UDP port. The same bridge design covers every BrainBit model: 4 addresses for the headband, BrainBit 2 and Flex 4, and 8 for the Flex 8.
127.0.0.1 is the address to use when the bridge runs on the same computer as Studio. The OSC input is not limited to that computer, so a bridge can also run on another one. Send to the IP address of the computer that runs Studio, allow the UDP port through its firewall, and do this only on a network you trust.
neuromore does not supply a reference bridge script yet. Until one exists, the test steps that need live EEG in the BrainBit test workflow cannot be run. The synthetic-signal steps with the Signal Generator node in the Browser test workflow can.
How the bridge talks to Studio
Section titled “How the bridge talks to Studio”- The bridge scans for the device, connects, and starts the signal stream. Check the vendor’s SDK documentation for which calls block, and run those on their own thread so the stream is not held up.
- For every sample, the bridge sends one OSC message per channel over UDP to
127.0.0.1:4545. Each message carries one 32-bit OSC float (type tagf). Any other argument type, such as a double or an integer, reads as 0 with no error. If a message has several floats, each one becomes a further sample. - Studio also accepts OSC bundles and ignores their time tags, so one bundle with all channels of a sample works. Keep each UDP packet to 1024 bytes or less.
- Send at a steady rate, and set Sample rate on each OSC Input node to the rate you really send. Studio treats each value as one sample at that rate and does not resample to a constant rate. See Send at a steady rate.
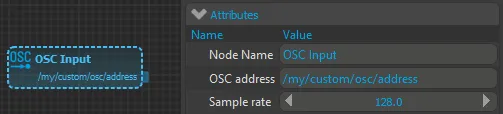
In the classifier, add one OSC Input node per channel from the Input category of the node palette. Set its OSC address to the message address, and set Sample rate to 250 (the default is 128). Connect each output, because an OSC Input node with nothing connected does not run.
Headband: four addresses
Section titled “Headband: four addresses”You need:
- A charged BrainBit headband.
- A computer with a Bluetooth LE adapter and a NeuroSDK 2 build.
- neuromore Studio. For this OSC procedure, the latest public release, 1.7.3, is enough. The browser chain, with the WebSocket server and feedback nodes, needs 1.7.0 or newer. See Installation.
- A neuromore account. You sign in when Studio starts, and the login window has no sign-up option, so create your account first. See Account.
Once a bridge exists, the procedure is:
- Start Studio and sign in. Check the port in NMStudio > Settings > Network > OSC Server > Input UDP port. The default is 4545.
- In the Back-End File System window, create or open a classifier. See Create a classifier. You build it in the Classifier window.
- Add four OSC Input nodes from the Input category. Set their OSC addresses to
/brainbit/ch1to/brainbit/ch4, or use electrode-label addresses/T3,/T4,/O1,/O2. Set Sample rate to 250 on each node. - Add a Merge Channels node from the Utils category and connect each OSC Input node to it. Its input ports grow as you connect, and all inputs must have the same sample rate.
- Add a View node from the Output category and connect Merge Channels to its In port. An input port takes only one connection, so four OSC Input nodes cannot share one View node directly. You can also give each OSC Input node its own View node.
- Switch the headband on, keep it close to the computer, and start the bridge. It sends four messages per sample, one per channel.
- Watch the Signal View window, where the View node draws its traces. The window is in the Default layout. If it is not open, choose Windows > Add > Signal View. The windows available to you depend on your account.
If no traces move, the display may be empty or frozen rather than flat, because no samples are added when no data arrives. Check these points:
- The bridge process is still running.
- The bridge sends to the port set in Studio, and the firewall allows it.
- Each OSC address matches the message address exactly. Two nodes with the same address show the error “OSC address is not unique” and do not run.
- If traces read 0 while the other checks pass, the bridge is probably not sending 32-bit floats.
| OSC message address | Argument | OSC Input node: OSC address | OSC Input node: Sample rate |
|---|---|---|---|
| /brainbit/ch1 | one 32-bit float | /brainbit/ch1 | 250 |
| /brainbit/ch2 | one 32-bit float | /brainbit/ch2 | 250 |
| /brainbit/ch3 | one 32-bit float | /brainbit/ch3 | 250 |
| /brainbit/ch4 | one 32-bit float | /brainbit/ch4 | 250 |
Flex 8: eight addresses
Section titled “Flex 8: eight addresses”Vendor data gives the Flex 8’s Bluetooth LE name as “Flex Pro”. The steps and prerequisites are the same as for the headband, with eight channels instead of four. Once a bridge exists, the procedure is:
- Start Studio and sign in. Check the port in NMStudio > Settings > Network > OSC Server > Input UDP port. The default is 4545.
- In the Back-End File System window, create or open a classifier.
- Add eight OSC Input nodes from the Input category, with addresses
/brainbit/flex/ch1to/brainbit/flex/ch8and Sample rate 250. - Connect all eight to a Merge Channels node (Utils category), and connect that to the In port of a View node (Output category).
- Switch the Flex 8 on and start the bridge. It sends eight messages per sample, or one bundle of eight messages per sample.
- Check the traces in the Signal View window before you add the rest of the classifier chain. If no traces move, use the checks in the headband section.
| OSC message address | Argument | OSC Input node: OSC address | OSC Input node: Sample rate |
|---|---|---|---|
| /brainbit/flex/ch1 | one 32-bit float | /brainbit/flex/ch1 | 250 |
| /brainbit/flex/ch2 | one 32-bit float | /brainbit/flex/ch2 | 250 |
| /brainbit/flex/ch3 | one 32-bit float | /brainbit/flex/ch3 | 250 |
| /brainbit/flex/ch4 | one 32-bit float | /brainbit/flex/ch4 | 250 |
| /brainbit/flex/ch5 | one 32-bit float | /brainbit/flex/ch5 | 250 |
| /brainbit/flex/ch6 | one 32-bit float | /brainbit/flex/ch6 | 250 |
| /brainbit/flex/ch7 | one 32-bit float | /brainbit/flex/ch7 | 250 |
| /brainbit/flex/ch8 | one 32-bit float | /brainbit/flex/ch8 | 250 |
Electrode-label addresses such as /T3 work too. Each address must start with a slash, be unique and carry a single float.
Expected limits
Section titled “Expected limits”None of these has been measured.
- Latency: The extra process and the UDP hop add some latency. Studio drains incoming datagrams on arrival, with a 100 Hz timer as a fallback.
- Lost messages: UDP does not guarantee delivery, so messages can be lost.
- Impedance and battery: Neither reaches Studio on this path.
- A second process: The bridge must keep running alongside Studio.
- Python throughput: Whether Python sustains 8 x 250 messages per second is not known.
- Units: How the values from the vendor SDK map to what your classifier expects is not known. See the BrainBit test workflow.
OSC basics are in the OSC Tutorial.
Platforms
Section titled “Platforms”For the interim path, the platform follows the vendor SDK, because the bridge is a separate process and the build architecture of Studio does not matter. Vendor data lists NeuroSDK 2 builds for Windows x64, macOS (x64 and arm64) and Linux x86_64. Check the vendor’s repositories for the current list. Windows arm64 is not known to be covered.
The public 1.7.3 macOS package of Studio is universal. Studio packages are also available for Windows and Ubuntu, see Installation.
A Windows 10 or 11 x64 PC with a Bluetooth LE adapter is a sensible first machine, because the native driver also targets Windows x64 first. macOS is possible in principle (R&D).
Licensing
Section titled “Licensing”Vendor SDK licensing is not yet confirmed.
Licensing: see neuromore Licensing, the Terms & Conditions, the End User Agreement and the Privacy Policy.
Related pages
Section titled “Related pages”- BrainBit browser neurofeedback (R&D)
- BrainBit test workflow
- BrainBit constraints
- BrainFlow boards
- Browser neurofeedback
- OSC Tutorial
- Biosensors (general overview; for BrainBit, this page applies)